Free tools and services such as XAMPP and DynDNS are an absolute blessing for me particularly when I need to develop my web apps and test them under development mode. Last year, I successfully set my home web server running on XAMPPLite to be accessible via DynDNS so that I could demo a website I developed. Recently, I assisted a friend of mine in setting up another server, but it wasn’t quite as smooth sailing.
I remembered that I only succeeded in setting up my server previously after much scouring in the Web. God knows how many times I tried and re-tried the instructions at DynDNS, even resetting my modem router and network settings of my computer just to be sure.
After combining what I’ve read in the Interwebs and testing the setting out, did I finally manage to get everything up and working. Port forwarding is one of the important things to do, but the way I do it is so much unlike most instructions I read on the web sites.
Using my new HTC Desire HD smartphone (yeah, I FINALLY have an Android phone, yippee!), I made a few screenshots of my web server port forward settings. If your Internet connection uses dynamic IP, and you use DHCP to assign IP addresses in your local area network, then I hope you find this useful.
Here’s how they look like on my D-Link modem router:-
(okay, am I the only one who thinks this Windows Live Writer is fricking funny AND cool?! … oh, alright… here’s the screenshots one by one…)
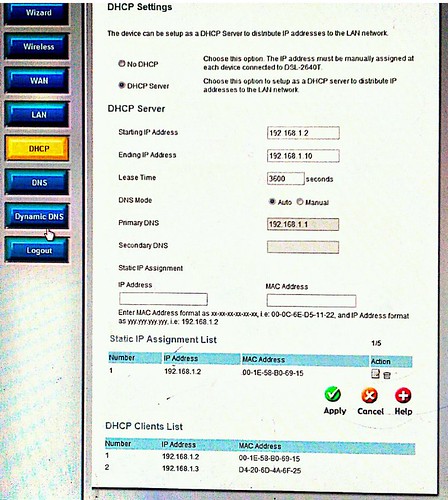
On my DHCP server setting, I made sure that the computer running XAMPP is using a static local network IP. You can also manually set this up in the Network Settings of the computer you’re using as your web server.
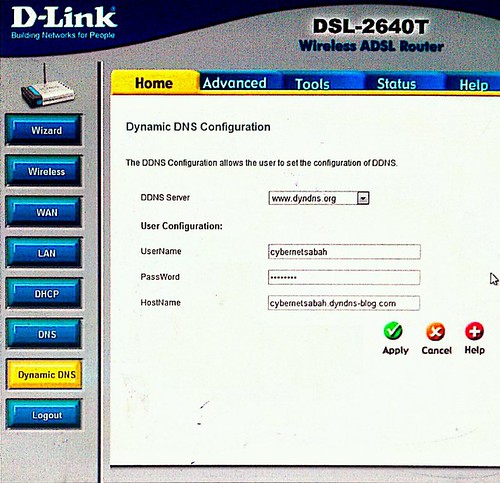
I also configured my dynamic DNS to my account at DynDNS. This way, I won’t need to download the DynDNS update client whenever my Internet connection changes its IP address.
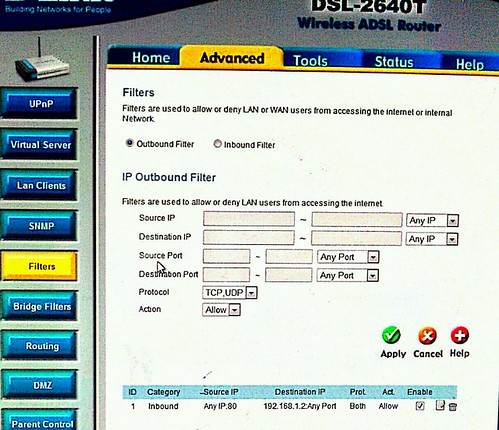
For Filters, I set all inbound Internet access to port 80 (the default web server port) to be forwarded to any port on my web server. I made sure to enable this setting, too. This is where the Virtual Server setting is suppose to help (notice the Virtual Server button on the navigation?), but for the life of me I couldn’t get the port forwarding to work using Virtual Server.
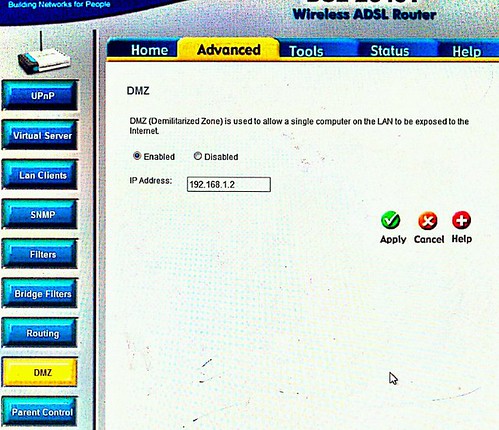
I set my web server local IP address in the DMZ (Demilitarized Zone). Okay, don’t ask my why I do this because I don’t know how quite to explain this to you other than the fact that… my gut feeling tells me to. DMZ is something that I learned while working with the system and network people back while I was in an IT company. In any case, you might just want to skip this one.
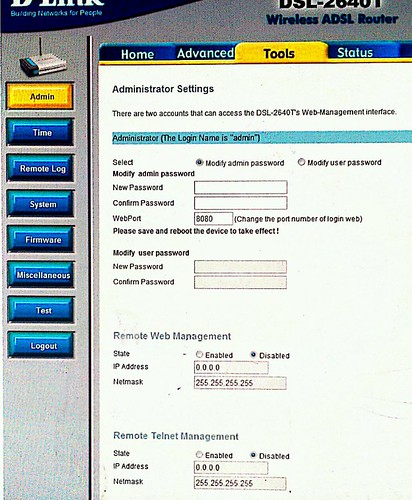
Last, but definitely not least, I changed my modem router’s WebPort from the default 80 to 8080. This MUST be done so that your modem router’s login page does not clash with your web server. From now onwards, whenever I want to access my modem router, I will have to type http://192.168.1.1:8080 before I am logged into the webadmin of my router.
Now that those settings are done, you just need to save the settings of your router and restart. You might want to restart your web server, too, just in case. Then, to confirm whether you can truly access your web server online, YOU MUST USE A DIFFERENT INTERNET CONNECTION THAN THE ONE USED BY YOUR WEB SERVER. Otherwise, you’ll get a false positive on the access (meaning, you tried and you find you can access it, when in fact other people outside of your network can’t).
Check out my other posts: « WordPress Thumbnails in Archives Page: making it work / I’m so bored of my blog theme… »

Nice this is great information. I have had such headaches with this before! This will save me time in the future I know!