Update 24/Mar/2022: Are you getting a DNS_PROBE_FINISHED_NXDOMAIN error? Jump right to the solution.
Being a total bum when it comes to saving cost on web hosting and such, I decided to combine a couple of my existing WordPress sites onto a single account. Consider this as if you’re non-technically hacking the one-website-one-database only limitation on your web hosting service, by running multiple website instances, then using sub-domains and domain redirects to create that almost-independent feel of separate, individual websites. Also, as a web developer, I’m also able to create temporary demo sites of my clients’ WordPress-powered websites before putting them up live.
The steps to setting up a site within a multisite-enabled WordPress is much simpler than setting up a single WordPress site. The important settings such as your database information and user accounts are re-used for the new site within your existing WordPress, so managing multiple websites is easier. I save hosting disk space, too, by not running multiple single WordPress installs, which can be bulky in and of itself.
The easy step-by-step process
I love how easy it is to set it up! The WP.org Codex on creating a network was enough guidance for me to complete my setup. Just make sure to back up everything that’s needed before you start the process of manually installing WordPress Multisite in your current WordPress website.
These are the exact steps I followed (copy pasting this from the WP Codex):
- Verified that my Pretty Permalinks work on my single WP instance.
- Deactivated all active plugins. Multisite setup will not continue if plugins are active. Plugins need to be manually reactivated after the multisite setup is complete.
- Logged into my website cPanel’s File Manager. My single WordPress is installed at the root folder (public_html).
- Created a copy of my
wp-config.phpfile as backup in case I screw up Step 5. - Opened up
wp-config.phpand add this line above where it says/* That's all, stop editing! Happy blogging. */:/* Multisite */
define( 'WP_ALLOW_MULTISITE', true ); - Saved the changed
wp-config.phpfile. - Refreshed my WordPress dashboard screen so that I can see
Tools / Network Setup. Then deleted my backupwp-config.phpto avoid hackers seeing my WordPress setup.
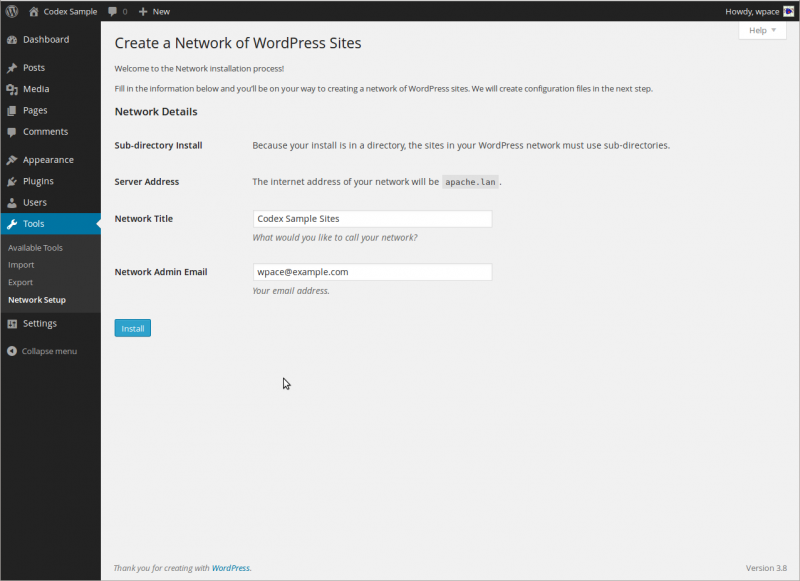
- Chose sub-domain installation, because it was automatically selected. That’s my preference, anyway, and because I installed WordPress in the root folder of my web directory.
- Clicked
Install. - Backed up my
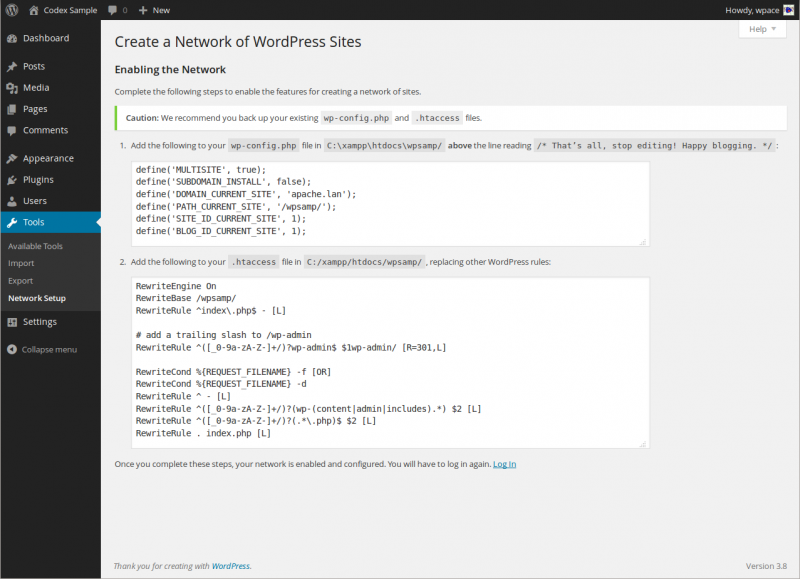
wp-config.phpandHTACCESSfiles in case I screw up Step 11. - Copy-pasted the codes exactly as what was displayed in my WordPress dashboard’s Create A Network of WordPress Sites page.

In my instance, for wp-config.php, I pasted the codes at the same location as where I pastedWP_ALLOW_MULTISITE(Step 5). Yes, just override that MULTISITE line with the lines that your dashboard displays. ForHTACCESS, I overwrite every rule that is between the#Begin WordPressand#End WordPresscomments. - Logged out of my WordPress dashboard, and log back in again. I should see My Sites and Network Admin listed on the top left of my dashboard. Remember to delete my
wp-config.phpandHTACCESSbackup files for security purposes!
The rest is easy peasy! Do re-activate your Plugins, and check your Permalinks settings (Settings / Permalinks) to ensure that it doesn’t reset itself to a different format. My Permalinks setting was changed drastically from my preferred
/archives/%postname%.htm to what I suppose is the default network permalink
/blog/%year%/%month%/%day%/%postname%/That unexpected change broke my site for a couple of hours without me realising.
But really, I still stand by my opinion that it is easy to change your single site to multisite.
A small, easily solvable cPanel issue
I ran into a problem when I tried to run my newly created second WordPress site. Let’s call it http://sub.webgrrrl.net. When I accessed it, my Chrome browser gave me a DNS_PROBE_FINISHED_NXDOMAIN notice, which means that my subdomain setting for my website was not set up properly.
Actually, all I had to do was to set up a wildcard DNS within my cPanel. I missed this part within Step 3 of the WP Codex that said so:
You only need wildcard DNS for on-demand domain-based sites, despite the advice that may be on the screen.
https://wordpress.org/support/article/create-a-network/#step-3-installing-a-network
cPanel wildcard DNS setup is pretty straightforward, too. Here’s what I did:-
- Log into cPanel.
- Navigate to the Subdomains icon in the Domains section.
- Add a subdomain called * (yes, just that asterisk symbol).
- Make sure to set the document root to your public_html folder.

Everything ran dandily afterwards, and I am now one happy grrrl.
Best practices of using a WordPress multisite
The cool people over at WPMU DEV shared a great presentation on the do’s and don’ts of having a multisite WordPress installation. I particularly like the tip pointing to the WordPress MU Domain Mapping plugin. I haven’t personally tested this myself, but the plugin looks like a good workaround to the single domain name-only restriction, if you happen to have that limitation in your web hosting account. Check out the presentation below.
Check out my other posts: « My blog management strategies for 2016 / You don’t blog anymore, do you? »