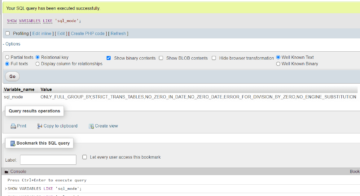
<

Words for the Smart Alec

Do not confuse luck with skill.

The Replacement Killers

<

DynDNS web server port forward on XAMPP: my quick-and-dirty method

Free tools and services such as XAMPP and DynDNS are an absolute blessing for me particularly when I need to develop my web apps and test them under development mode. Last year, I successfully set my home web server running on XAMPPLite to be accessible via DynDNS so that I could demo a website I developed. Recently, I assisted a friend of mine in setting up another server, but it wasn’t quite as smooth sailing.

I remembered that I only succeeded in setting up my server previously after much scouring in the Web. God knows how many times I tried and re-tried the instructions at DynDNS, even resetting my modem router and network settings of my computer just to be sure.

After combining what I’ve read in the Interwebs and testing the setting out, did I finally manage to get everything up and working. Port forwarding is one of the important things to do, but the way I do it is so much unlike most instructions I read on the web sites.

Using my new HTC Desire HD smartphone (yeah, I FINALLY have an Android phone, yippee!), I made a few screenshots of my web server port forward settings.  If your Internet connection uses dynamic IP, and you use DHCP to assign IP addresses in your local area network, then I hope you find this useful.

Here’s how they look like on my D-Link modem router:-

(okay, am I the only one who thinks this Windows Live Writer is fricking funny AND cool?! … oh, alright… here’s the screenshots one by one…)

Read the rest of this entry »

Share

WordPress Thumbnails in Archives Page: making it work

The attack of the insomnia has hit again, so I’m taking this advantage to update the Top Commentators Widget (which is now in 1.5-beta and downloadable via WordPress Extend if you wanna try it out — this blog is currently running it) as well as a couple of my favourite niche sites.

One niche site I own, Cross Stitch For Free, displays the archives of its posts together with its respective thumbnails. These thumbnails are generated automatically by the Ordered Thumbnails plugin, which scans the post for any image and uses the first image it finds as the default thumbnail.

Since WP 2.9, thumbnails are built into the core, which means that I don’t have to rely on any plugin in order to generate it. All I had to do was add a few codes in my functions.php and archive.php, and that supposedly should do the trick.

Unfortunately, it wasn’t as simple as that. But it ain’t too complicated, either.

I followed the exact same steps as told in the WordPress Codex, which was to add the add_theme_support()theme function in the functions.php file, and the_post_thumbnail() in the archive.php file (making sure the function is within the Loop). But nothing showed.

After an hour or so researching the Web, I was finally able to guess why. I needed to edit each post, then go toAdd an Image > Gallery or Media Library if the image isn’t attached to that particular post, Show the image to expand its options, and, most importantly, click Use as featured image. And I needed to do this for every single post I want a thumbnail to appear in.

"Use as featured image" WordPress thumbnails in archive.php

I suppose it’s fine if you don’t have that many posts in your blog as in my case, but if you already have hundreds, then best of luck to you. I believe there may be a few WP plugins out there that may help solve this problem, but I didn’t bother trying it out. My niche blog only has close to 70 pages, and I’m already finding it tedious to manually set them one by one. You can see the difference yourself; view the first few pages of the archives and then see how the last two pages of the post archive look like without the thumbnail featured image being set (scroll to the end of the page and find the last two page numbers you see).

In any case, it’s always good to utilise the core hooks of WordPress rather than relying on plugins, if you’re comfortable hardcoding your blog templates. They’re faster, more reliable, and safer.

Share

Top Commentators Widget mini update (v.1.4.2)

A quick heads-up on the latest TCW update, in line with the release of WordPress 3.1. This update also addressed the comment hijacking issue that, while wonderfully suggested and fixed by Stuff by Sarah quite a while ago (and implemented by yours truly on v.0.999a) , were not fully effective in blocking the comment spammers. Basically it’s a small rewrite of the database query, that’s all. This means that v.1.4.2 won’t affect your >=TCW 1.4 settings in any way.

Nevertheless, Top Commentators Widget v.2.0 update, to coincide with the next WordPress update (whether major or minor), will again affect your setup.

  1. The form control, i.e. what you see in the Widgets section, will be re-arranged to simplify it.
  2. Further modification on the look of your Number of Comments will be enabled.
  3. Styling of the list for CSS purposes will be improved.
  4. Addition of DIV on top of Numbered and Ordered.

I like WP 3.1. Do you?

Share

Urgent update: Top Commentators Widget v.1.4.1 beta

IMPORTANT: If you have customized the styles in any way on this widget, be aware that this update may break them!

Fingers crossed, this version of TCW (downloadable in WP.org’s plugin repository) should address all of the problems encountered in v.1.4 as mentioned in the comments of my previous post (especially those disappearing settings / changes in form not committing). I honestly THANK YOU for your comments – you have no idea how I appreciate all those bug reports you all have given.

The widget has gone through a heck of a major rewrite between v.1.4 and this one, so what does this really mean for your blog?

  1. This version and any future updates of the Top Commentators Widget will no longer be compatible with WordPress installs prior to version 2.8. Sorry, folks, it’s just to inconvenient to make it backward compatible.
  2. TCW is finally using the widgets API available since WP 2.8, which means that 1.4.1 beta now supports multiple instances of the Top Commentators in your blog!
  3. Due to the support for multi-instances of this widget, the ID and CLASS styles may be called differently. You may not notice much difference especially if you’re only using a single instance of the Top Commentators widget in your blog, but you need to be aware of this in any case.

If you don’t feel at all comfortable with the changes in v.1.4 and this one, the older versions of this widget is still available at the WP.org repository; just find the link at the sidebar named “Older version” and grab the version that fits your blog.

Version 1.4 is so unstable, that I’ve decided to label this update as a beta. However, please feel brave enough to at least install this version in your sandbox and let me know how it goes in your blog. Please please please let me know, working or not, I would really like to know.

The TCW may be deactivated from your Widgets list due to the new API calls it makes. Therefore, once upgraded, please make sure you revisit your Widgets page and re-do your settings, then Save them.

I’d better give my back a rest. This slipped disc injury is scarily painful; I hope I’ll gain full mobility soon. My home and my kids are a wreck without me.

Share

WordPress Top Commentators Widget v.1.4

If you have issues with the latest update (v.1.4), keep those feedback coming; please add them in the comments section below. I am currently working on the fix as of this moment.

The latest version is up at WP.org’s plugin repository. As mentioned in the README file:

  1. Added the Award option which will display image or icon of a medal/badge once a commentator reaches a certain number of comments determined by blog owner.
  2. Modified the form to allow default values to be entered automatically when initialized (i.e. widget’s Save button is pressed).
  3. Added support for setting default Gravatars to 404, Mystery Man, Identicons, MonsterIDs or Wavatars.
  4. Repaired the query statement for filtering e-mails.

screenshot-3

Thanks to Konsti for the award/gaming suggestion. For now it only takes into account a single range. Hopefully in the future the widget can scan based on how active a commentator is, then award these users based on different levels of comments contributed.

Change number 2 is mainly for those who’ve complained that the top commentators wasn’t showing even after the widget is installed. Remember to go to the Widgets option, add the TCW in, and click the Save button to initialize its values. The widget won’t display anything if you do not press the Save button and get those default values entered into your WordPress options database.

A year ago, user iferg requested that the TCW supports other default Gravatars like Identicons, MonsterIDs and Wavatars. I finally had a chance to read up on this, and added that option into this widget.

Last, but not least, user ostin654 contributed a fix to the e-mail filtering bug, so I really appreciate that!

If you would like me to keep updating this WordPress plugin, I would like to ask just one thing from you – if you have a bug and/or a fix to report, or if you have modified the codes in any way that would benefit the TCW users, please share it with us. I’ll be sure to credit you and add those modifications in the next update. This would be the best way to continue making Top Commentators Widget useful and fun to use.

Please skip the rest of my post below; these are just notes to self so that I’ll remember how to update the TCW repo next time.

For new projects

  1. Create a new folder in your computer.
  2. Download and install TortoiseSVN.
  3. Right-click on the new folder and select SVN Checkout.
  4. Set the WP.org repository URL and WP.org login info.

To edit code

Change the stuff under the Trunk folder within the new folder you created.

To update code

Right-click on the new folder or the Trunk folder itself, and select SVN Commit to check the files in. Add in the message “Version #.#” in the message section.

To tag code

  1. Create a new folder within the Tags folder, naming it with the same version number as your current HEAD/trunk.
  2. Copy all files in Trunk and paste it in the Tags folder with the version number.
  3. Right-click on the Tags folder and select SVN Commit.
  4. Add in the message “Tagging version #.#” in the message section for housekeeping purposes.
Share